
This guide breaks down how to clean your vape device properly, what parts to check regularly, and how to spot early signs of wear or trouble. Let’s walk through what you need to know.
1. Why Cleaning Your Vape Matters
Vapes may not look like they collect a lot of dirt or grime, but inside, there’s always buildup happening. Over time, old e-liquid residue, dust, and condensation can impact your device’s performance.
Here’s why regular cleaning helps:
Flavor stays clean: Old e-liquid residue can mix with new flavors and affect taste.
Better vapor production: A clean coil and airway provide a smoother experience.
Longer lifespan: Keeping components clean reduces the chance of clogs, corrosion, or leaks.
Reduces malfunction risks: Dirt and residue in connectors or buttons can interfere with proper function.
Even if your vape seems to be working fine, regular maintenance can help avoid small issues before they turn into expensive problems.
2. What You’ll Need to Clean Your Vape
You don’t need any special tools or cleaning kits. In fact, most people already have what they need at home. Before you start, make sure your device is turned off and disconnected from power.
Here’s a simple checklist:
Paper towels or microfiber cloths
Cotton swabs or pipe cleaners
Warm (not hot) water
A small bowl or container
Rubbing alcohol (optional, for deep cleaning metal parts)
Dry space for air drying
Avoid using any strong chemical cleaners or soap. These can leave behind residues or affect the taste when you vape again.
3. Step-by-Step Cleaning Process
Depending on the type of vape you use—refillable tank system or pod system—there are slight differences in cleaning. The following process applies to most refillable systems and reusable devices.
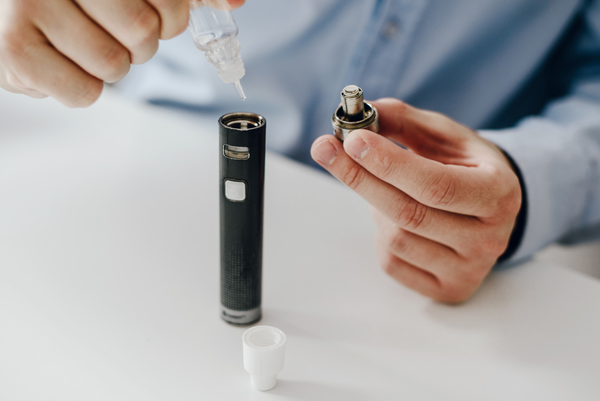
Step 1: Disassemble the Vape
Remove the tank or pod from the battery.
Take apart the tank—this includes the mouthpiece, glass section, coil (if replaceable), and any other removable parts.
Step 2: Rinse the Tank
Rinse the tank parts under warm water.
If there’s heavy buildup, soak the parts in warm water for 15–20 minutes.
For sticky residue, use a cotton swab or soft brush to gently scrub the inside of the tank.
Step 3: Dry Thoroughly
Use a paper towel or cloth to dry the parts.
Let them air dry for at least 30 minutes before reassembling.
Never reassemble wet parts—moisture can damage electronics.
Step 4: Clean the Coil (Optional)
If the coil is used and already showing signs of wear (burnt taste, dark residue), it’s best to replace it.
If it’s still in good shape, a light rinse and dry might help extend its use slightly—but this isn’t a long-term fix.
Step 5: Clean the Battery Connection
Use a cotton swab lightly dampened with rubbing alcohol to wipe the battery contacts.
Avoid getting liquid inside the battery.
Routine maintenance becomes even more important if you switch flavors frequently or use strong e-liquids. For example, users who try multiple profiles—like the variety found in mr fog max devices—may notice leftover flavor residue if they don't rinse between refills.
4. How Often Should You Clean Your Vape?
How often you should clean your device depends on how often you use it and what type of e-liquid you’re vaping. But here’s a general guideline:
Light cleaning (quick rinse and dry): Every 2–3 days
Full cleaning (disassemble and deep clean): Once a week
Coil replacement: Every 1 to 2 weeks depending on usage and flavor change
You should also clean your device if you notice:
A drop in vapor production
Gurgling or popping noises
A burnt or off flavor
E-liquid leaking from places it shouldn’t
Making cleaning part of your routine keeps your vaping experience consistent and saves you from buying new devices too often.
Cleaning is also a good chance to check other things like battery health or pod connections. Some vapers who like to switch between strong and subtle flavors—like those available in north vape flavors—find that keeping a clean setup helps make the transition smoother and keeps flavors from blending.
5. Common Mistakes to Avoid
It’s easy to overlook a few things during cleaning or maintenance. Here are a few common errors and how to avoid them:
Reassembling too soon: Always let parts dry completely before putting them back together.
Using soap: It can leave behind unwanted taste or residue. Stick with warm water or alcohol for metal parts.
Forgetting the airflow: Airflow holes and valves can clog with residue. A pipe cleaner or small brush works well here.
Not checking seals: Rubber O-rings or gaskets can wear out. Replace them if they look cracked or loose.
Also, don’t forget to store your vape upright and in a dry area. It helps prevent leaking and keeps dust out of the mouthpiece.
Some vapers rotate between multiple devices, especially if they enjoy the different characteristics of options like orion vapes. If you're doing that too, make sure each device is cleaned before storage to prevent dried-out residue or corrosion during downtime.
Final Thoughts
Maintaining your vape device doesn’t need to be a big chore. With just a few minutes of attention every few days, you can keep your device running smoothly and tasting fresh. This also helps you get the most out of your coils and e-liquid, saving money in the long run.
To sum up:
Rinse your tank regularly and let it dry fully
Check and replace coils as needed
Keep battery contacts clean
Don’t rush the drying or reassembly process
Clean more often if you switch flavors or vape heavily
Treat your vape like any other tool you use often—it works better and lasts longer when it’s clean and cared for. A simple maintenance habit now means fewer problems later and a smoother vaping experience every time.